
This week was super fun because I got to live out my long-time dream of becoming a famous act-ohr. You guys just watch and wait, I will be big one day! Big, I tell ya!
Until then, though, I will continue writing these blog posts and keep you up to date with my technological journey 💁♀️
I have to say that this week’s lecture was probably my favourite one. It was not only really fun but quite educational as well, a double whammy. And if you haven’t already deducted what the lecture was about (did I not give enough clues??), we have indeed discussed shooting and editing videos.
Now, this is an area – and I know I say this aaall the time but this time I really mean it – that I genuinely have absolutely no idea about. Zero. Zip. Nada. I really haven’t done any video editing ever and though it looks like soo much fun to sit in front of the computer for days, severely sleep deprived, mmm I don’t know, it just never really interested me. Though, of course, after this week’s lecture, I am definitely hooked and have even downloaded a [free] video editor (more on that later).
The lecture’s focus was on how to film, specifically within an educational setting, whether it is the students doing the filming or you as a teacher trying to record educational content. Of course, all of this was rather basic and rudimentary but as a complete noob, I appreciated the rudimentary-ness of the information. James (the super-awesome TME lecturer) has recorded a video himself, discussing a few important tips to remember when trying to video record. Keep in mind that these tips are aimed more towards a practical approach when making educational-style videos. It doesn’t include the more artistic and high level video recording.
So without further ado, here are James’ few tips:
- Make sure that you frame your video well so there is no unnecessary empty space behind you. If there is any empty space, you want to be facing it, not having your back to it, unless you are in the middle of shooting a horror movie. Then go crazy and run away from that ghost 👻
Another aspect to be careful of is making sure that the subject of the video centred behind a relatively neutral background. Pointing your camera into the corner of the room, for example, can make the shot feel ‘wonky’ as James has put it. Personally, I noticed how the video can also look quite busy and can draw the attention away from the subject. When considering how to frame the shot, you also want to consider whether you need to be far away from the camera to show body movement, closer but not too close for when you are just speaking into the camera, and even closer (a close-up of your face) for when you maybe want to get more intimate, inspirational, serious etc.
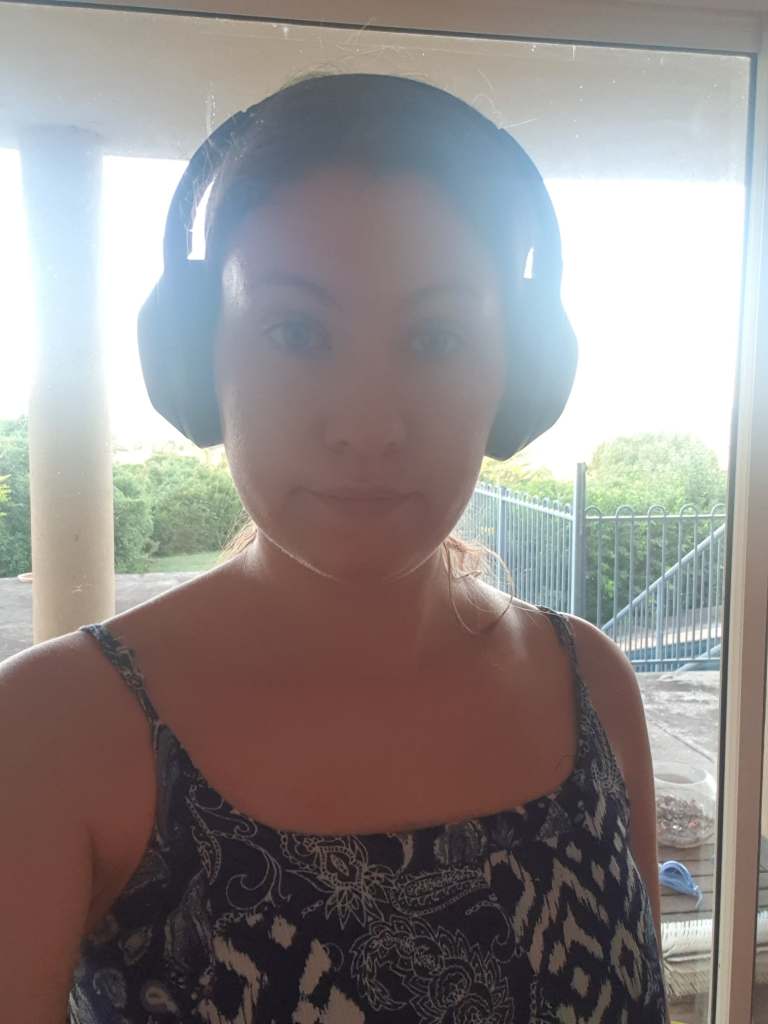
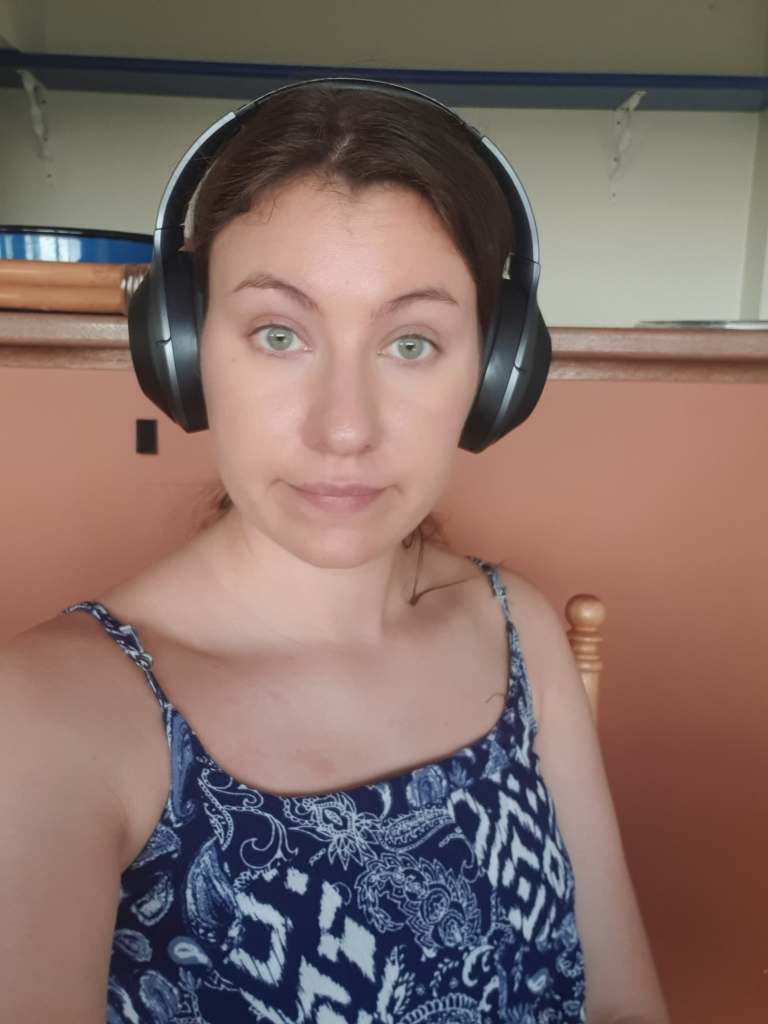
2. Make sure that there is no light behind you or above you. You usually want the light to be facing you so your face is not in the dark. Having light in awkward places can oftentimes cast unflattering shadows on your face (unless that’s what you’re going for in which case, you do you👍). Now of course, if you don’t have professional equipment at home, which let’s be honest many of us probably don’t, then there are a few tricks which you can do. As you can see from the two photos that I took, I opted for the most obvious option using Mother Nature’s natural gift of light. On the left one, I am facing the natural light while on the right one, the light is behind me, thus creating a shadow on my face.
However, if by any chance you do not have access to natural light, you can always take a desk lamp, cover it with a muslin-type-of-cloth so as to not blind yourself, and direct it towards your face while recording. Unfortunately, I am not able to demonstrate this option because for some reason I don’t actually own a desk lamp due to doing all my work in the dark. Like a bat.
3. If you can, try and record the audio with a good recording device, preferably a fancy mike. I don’t have a fancy mike but I am waiting to receive the Blue Snowball mic which I mentioned in my earlier post on microphones. You can also use your phones mic if your camera’s or laptop’s mic if you’re a bit desperate. James is quite fancy and used three different mics to demonstrate the audio difference between them: his Lapel microphone (the little microphone you attach to yourself), his pencil microphones (the condenser microphones oftentimes used to cover a larger area) and the microphone he uses for Zoom calls. However, here comes the tricky bit (though not actually difficult). Once you record the video and you also have your audio from whatever microphone you used, you need to be able to synchronise the sound with the video. This is why it’s good to clap at the beginning of recordings in order to be able to sync the audio with the video sound. The video below explains it really well, much better than what I would be able to. Check it out!
To demonstrate at how easy it really is, here is a short video I recorded with my laptop camera while using my phone recorder for audio. As you can probably tell, I really don’t have ANY fancy equipment with me but you can make do with what you DO have nonetheless. See if you can tell which video uses my phone’s audio and which one uses my laptop’s (though the title of the video already gives it away😅). Spoiler alert, the difference isn’t that dramatic. 😏
4. Try and use several different angles when recording in order to capture more than one thing you might be talking about. For example, if you are recording a ukulele tutorial, you might want to have a wide shot of you talking and a close up shot of your fingers playing the chords. In that case, you will need to try and put those two shots together by using a video editor. When I attempted to do the same, I didn’t actually have a video editor so I used the video editing app that comes with Windows 10. Unfortunately, the app doesn’t really have that many options so I opted to use the demo version of VideoPad. Unfortunately, after you use your free trial, you won’t have the option to export the video edit you have just made. I am yet to figure out a way around that. However, thanks to my free trial, I exported the video nonetheless so here it is! Enjoy my extremely helpful tutorial that I have attempted to make within 20 min of allocated online class time.
On that helpful note, hope you found this blog a little helpful, if not the tutorial above :p Let me know how well you know video editing and what would be some creative ways to utilise it in the classroom 🙂
And until then, camera, lights, action!
