Why hello there, it’s been a while (almost a whole year 😬).
Life definitely got busy and, unfortunately, I did end up neglecting this blog a little. However, I did miss interacting and discussing my thoughts and ideas on different education-related topics so what better way to have a come-back than to write a blog post about an assignment I am currently working on (in my last year of Music Education degree! Woo!).
Yes, it is an assignment and this may not sound incredibly riveting. However, I believe that every assignment I have been working on this semester has been so incredibly beneficial to my further growth as a future music educator and this one is no different. So let’s get to it!
Hmm a mixed bag you say?
This assignment is part of the Composition for Music Education unit in which we learn how to teach and/or do composition for our students. In this particular case, we were tasked to arrange or compose a song or a piece that the students can easily learn through both aural learning and notation on any range of classroom instruments. The idea behind the assignment is that often we will have students of differing skill levels who can either play 5 instruments and read notation incredibly well or are not even able to clap a simple beat pattern (and anything in between!). Therefore, we need to be able to accommodate to all of our students, i.e. the ‘mixed bag’ approach, where each part is translatable to any number of instruments.
The philosophy of mixed bag arrangement, from my perspective anyways, seems to argue two important points: music should be easily accessible and played by every student in your classroom and every student should have the opportunity to improvise and compose.
During the NSW 2015 Orff conference, James Humberstone discussed the importance of exploring a variety of popular music or Post-Minimalist film music as a useful way to not only engage students with a greater variety of musical repertoire but to also encourage aural learning through the Orff method of listening and repeating as well as learning how to improvise (Humberstone, 2015). Indeed, it is incredibly important for students to not only feel connected to the music studied in class but also have the opportunity to practice their listening and composition skills, something that can easily be overlooked in many music classrooms.
This sentiment is echoed by Jim Vennemeyer in his 1999 article ‘Orff + Technology = Composition for Kids’. Yes, the article is quite a bit older and yet, I found it expressed the same sentiment taught by our lecturers and that is that “by combining Orff teaching strategies and instrumentation with the technological advances of the latest composition software, many of the barriers normally associated with teaching composition to […] students are removed” (p. 36).
I cannot agree more! Through this mixed bag arrangement, we are tasked to think about how we can make playing more accessible to our students without necessarily relying on notation too much. A great solution to this is to either use approached such as Orff Schulwerk method where there is a great emphasis on aural learning, or an Informal Approach where the emphasis is given to self-learning by students, mostly provided through many technological resources by the classroom teachers. In turn, because the students are already prepared to succeed by the teacher, they will naturally feel more comfortable in taking their music learning towards the next step: improvising and composing.
David Beckstead further the emphasises the importance of the improvisational aspect within the music classroom in his article ‘Improvisation: Thinking and Playing’. He states that due to there being very little cognitive difference between complex and simple improvisation, as music teachers we should actively encourage any form of creative outlet for students to engage with (2013). The point is not to see which student is naturally talented in creating complex melodic lines but rather to encourage creative output for every single student. This all comes back to the mixed bag approach in which every student is given the opportunity to play any instrument they feel comfortable with which in turn makes the student more relaxed when faced with the scary concept of IMPROVISATION.
Now you may wonder, how does one choose an appropriate piece that could work really well for the Mixed Bag Arrangement?
Well, I’m glad you asked.
Mixing the bag
Here were a few of the points I tried to consider when choosing my piece (which was Game of Thrones opening theme btw):
- I was hoping to create an arrangement that could be potentially used by older students, especially as I am soon to start my final year practicum. GoT theme probably wouldn’t be alright to use for younger grades but Year 11 and 12 could work quite well.
- I tried to choose a piece that had repetitive and/or sequential melodies and harmonies as it is easier to learn aurally.
- I tried to find a piece that also had a repetitive percussion parts which would give an opportunity to play for those students who don’t really play any instruments.
Of course, I had to do some tweaking with the actual theme but the point is not to mimic the exact nature of the way the music is originally played but rather to break it down into several different parts which the students can easily play. After much deliberation, this is how I decided to structure my approach towards the arrangement:
- Make the key an easy A natural harmonic (A aeolian).
- Have four parts for melodic instruments. One is the main melody, one is the repetitive ostinato-like part, one is a harmony part with long chords (made specifically for students who can’t read music as well) and the last part is a bass part.
- Have three percussion parts. One of the percussion parts is incredibly easy and is really only reserved for students who really struggle with notation or playing any instruments. However, it can also serve for those students who find more enjoyment from playing any parts as long as they are part of a larger ensemble. The other two parts are slightly more complex but incredibly repetitive and still don’t require a great amount of skill.
- Provide musical notation for every type of instrument. See Image 1 and 2 below for an example of how my final score looked like.
- Create an Orff instrument arrangement. This is beneficial if some students haven’t brought instruments to class. Likewise, if I want to focus on modelling aural learning through Orff methodology, having an Orff instrument arrangement makes sure that the students are all playing similar instruments and are able to directly copy what I as a teacher am trying to convey.
- Provide extra learning resources through the form of audio recordings of each individual parts and video recordings that help the students learn and practice their individual parts. In this way, the students can also be tasked of learning the arrangement not through Orff approach but through Informal Learning where they use the resources provided by the teacher to learn within their respective groups. This is particularly useful in promoting individual and creative learning as well as giving the students a certain degree of autonomy. Lucy Green, the pioneer of Informal Learning argues that through this autonomy, the students’ enjoyment might actually increase and, as a result, create ‘highly motivated’ individuals who will ‘more likely […] apply themselves’ and ultimately, learn more (2008, p. 93).
- Encourage students to create and arrange their own music through the usage of familiar material from the mixed bag arrangement. I have included the midi files of each individual part which the students can use in programs like GarageBand or Soundtrap. I link before a short loop I created as an example of what the students can potentially do with the provided midi files.
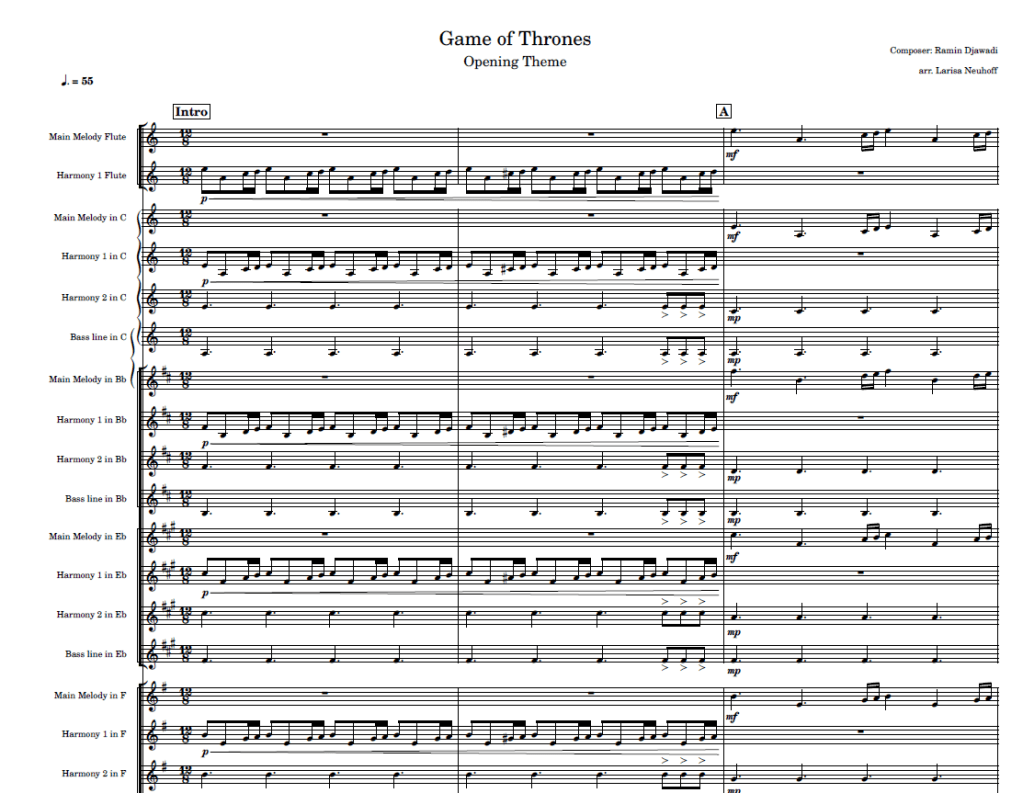
Image 1 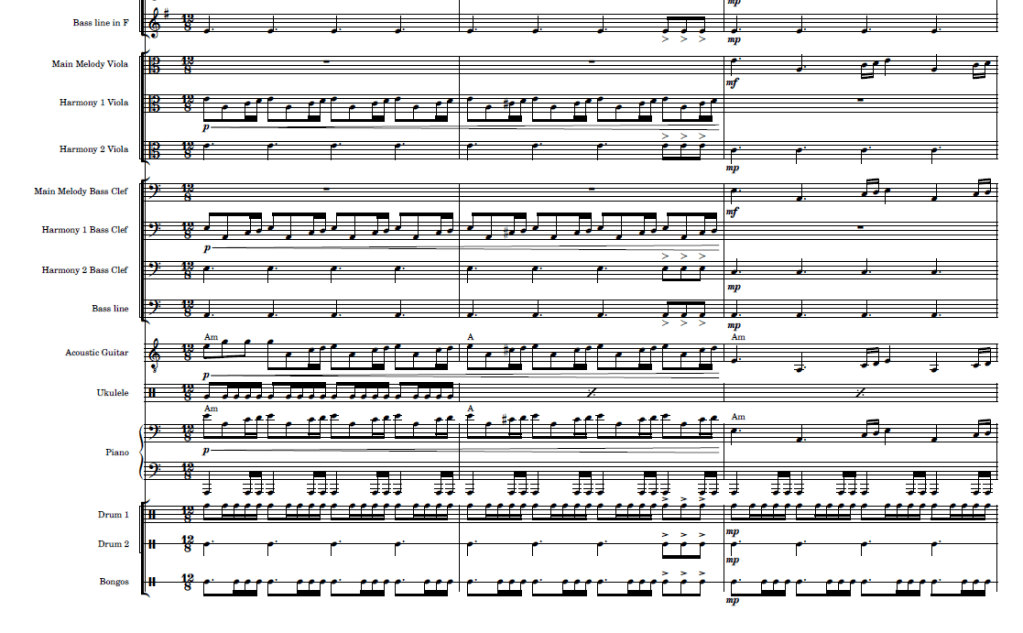
Image 2
Final reflection
I am definitely not a composer nor do I arrange music regularly so this assignment definitely proved to be useful just for the fact that it helped me further develop these essential skills. However, even more so, I felt that I learned the importance of providing students with every possible opportunity to be successfully involved in classroom activities, with no fear of making mistakes or being able to successfully play instruments. As a ‘serious’ musician myself (what does that even mean??), this concept is definitely not something I have often seen throughout my music education so I have to say, it is incredibly refreshing and has definitely encouraged me to be more intentional and thoughtful with my classroom resources 😊
Reference list:
Beckstead, D. (2013). Improvisation. Music Educators Journal, 99(3), 69-74. doi: 10.1177/0027432112467822
Humberstone, J. (2015). Towards a Pluralist Eduation. Speech, NSW Orff Schulwerk Association Conference.
Vennemeyer, J. (1999). Orff + Technology = Composition for Kids. Teaching Music, 6(6). Retrieved from https://search-proquest-com.ezproxy.library.sydney.edu.au/docview/1518484?pq-origsite=primo Green, L. (2008). Music, Informal Learning and the School: A New Classroom Pedagogy [Ebook] (1st ed., p. 93). London: Routledge. Retrieved from https://doi-org.ezproxy.library.sydney.edu.au/10.4324/9781315248523
Green, L. (2008). Music, Informal Learning and the School: A New Classroom Pedagogy [Ebook] (1st ed., p. 93). London: Routledge. Retrieved from https://doi-org.ezproxy.library.sydney.edu.au/10.4324/9781315248523